Flutter Getting Started
1) Install the IDE and hardware files
1.a) Install the code editor (called an IDE)
Download and install the latest IDE from:
https://www.arduino.cc/en/Main/Software
1.b) Add the Flutter hardware definitions to Arduino
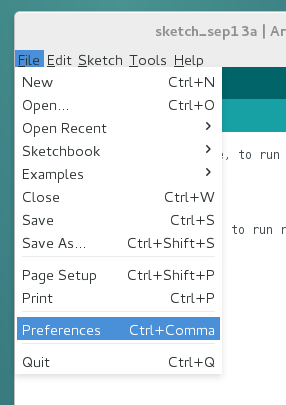
In the Arduino software, open the preferences menu. On Linux and Windows, go to File->Preferences and on a Mac, go to Arduino->Preferences.

Open the menu for "Additional Boards Manager URLs"
Paste the following URL into the resulting menu:
http://flutterwireless.com/files/package_flutter_index.json
Hit OK to close the "Additional Boards Manager URLs" window, then hit OK to close the Preferences window.
Next, use the menu to go to Tools->Board->Boards Manager as shown in the image below.
In the resulting window, type "Flutter" in the search bar, and click the install button.
Allow the software to download and install, then close the boards manager. Your Arduino IDE can now program Flutter hardware, but you'll need two libraries before you can use Flutter.
2) Install the required libraries
Choose the Flutter Library
It is very important that you use the correct Flutter library for your region. Using the wrong library may cause your flutter board to transmit on critical safety channels in violation of local laws. There is no performance difference between library versions.
EU Users:
The Flutter EU library will select channels from the 863-870 MHz band. Please download it here:
http://flutterwireless.com/files/library/Flutter_EU.zip
US Users:
The Flutter US library will select channels from the 902-928 MHz band. Please download it here:
http://flutterwireless.com/files/library/Flutter_US.zip
AUS/NZ Users:
The Flutter AUS library will select channels from the 915-928 MHz band. Please download it here:
http://flutterwireless.com/files/library/Flutter_AUS.zip
Install the zip file
Once the library is downloaded, add it to your IDE by going to Sketch->Include Library->Add ZIP library in the Arduino menu.
Install an additional required library
Next, add the extEEPROM library by going to Sketch->Include Library->Library Manager and searching for extEEPROM.
You're done!
Make sure to select the Flutter Basic from the IDE menu (even for the Flutter Pro).
Running Your First Program
1) Prepare new boards for programming
The Flutter boards come with a test program that prevents the USB from working, so the first thing you need to do is erase that. Use the following hard erase procedure to clear new boards for programming:
a) Hold down B1 on the Flutter board.
b) Apply USB power.
c) Wait at least 1/4 second.
d Remove USB power.
The board should now be erased. You can use this procedure to erase your board at any time, even if the software is locked up. Under normal use you can also put an erase routine in your program to erase the board with a single button press. In time boards will auto-erase when programming, but that functionality is still in development.
2) Load and Program RangeTest example
a) Open RangeTest Example
Once you have the board erased and the software opened, go to File->Examples->Flutter and select "RangeTest", as shown here:
NOTE: if Flutter examples are not visible, you may first need to select the Flutter Basic from the board menu under Tools->Board->Flutter Basic
b) Select your board from the Port menu
If you erased your board properly, the computer should automatically install the drivers for your Flutter hardware when it is plugged in. The Windows editor files from Step 1 also contain a folder called "drivers" that may be needed for manual driver installation.
In the Arduino editor's menu, go to Tools->Port and select your Flutter Board.
NOTE: The Linux view is shown above and Mac would be similar. Windows uses a different port naming scheme so the name would be something like "COM1".
c) Program the example into the board by pressing the "Upload" button (the right arrow in a circle) or go to File->Upload
If the board was successfully programmed, the LED should begin rapidly blinking.
NOTE: Currently the software does not consistently start the program after it has been uploaded to the board. To run the program, unplug the board from USB and plug it back in.
3) Program a second board as a receiver
a) Change the program for receivers
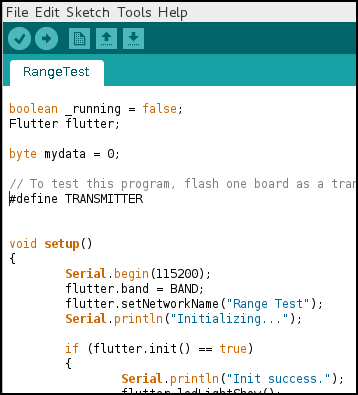
Follow the same procedure as above using a second board, but before programming the board, change the following line from this:

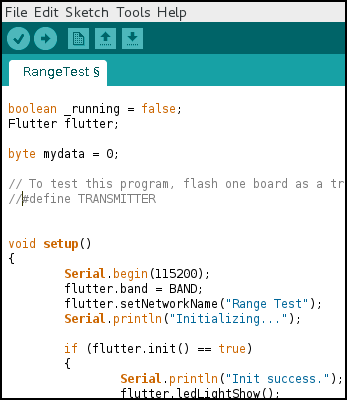
to this:

b) Program the receiver
Use the "Upload" button to program the second board. If the first board is still running, the second board should synchronize within two seconds and start blinking in step with the first board. If the first board is not plugged in, do that now and the second board should synchronize within two seconds.
4) Go test the range!
Once you've programmed the Range Test program into two boards, find a USB battery or two distant outlets and see how much range you can get! You should be able to get several hundred meters through buildings, and up to one kilometer when you have a line of sight connection and the boards are held at least 2.5 meters above the ground.
Once you test the range, tweet a photo to @FlutterWireless!